That's right, I have secured myself a mooring for the season. While I was hoping to be a little closer to Portland, Brunswick is nice, and I do not know that much about Brunswick, so it can be something more to adventure and blog about!!!
Now that I have the mooring, I now have to get the boat ready to go. There's still so much to do. And so much to buy. CRAP!!!!!
On a totally random note, I really appreciate that I have a really international audience. I'm not talking just people I know in places like Canada, Russia, and Tonga. I have had some views from Taiwan, India, Latvia, Lithuania, and some others! I do not think that I know anyone in those places, and it is really exciting to me that people are finding the blog on the interwebs!
Thursday, April 18, 2013
Monday, April 15, 2013
Sawdust, resin, and paint fumes.....
The unfortunate truth is that I really did not get much accomplished this weekend. Fortunately, I have been catching up on some sleep, talking to people about things I need for the boat, and in general spending time thinking and trying to prioritize what needs to get done to get the boat in the water!!!!
 The first thing to get accomplished before the glassing began was to remove the cross piece from the hatch that had been glued into place. My dad has been so eager to help, he took care of this for me during the week. It was not exactly a clean separation, but what do you expect with high quality wood glue? The reason the crosspiece needed to be separated before glassing is this: I do not have the hands of a professional fiberglass tech, so I would have ended up glassing it into place, on top of it already being glued into place.
 The next order of business was to round all of the corners on the hatch. I might have mentioned this before, but glass does not like to conform to sharp angles. By taking a belt sander to all of the edges, I was able to achieve a nice gentle curve for the glass to follow. The other bonus of doing this is that when the glass hardens, it will have a nice curved edge, which will look really nice.


Finally I was ready to glass. I was going to do one layer, let it cure, and then move on to the consecutive layers. I don't know why I thought that was going to be a good idea, since it just meant a lot more work. It ended up not happening because I did not have a big enough container to mix resin in. If you mix too big a batch of resin, sometimes it will start to set WAY TOO SOON! When I got the first batch mixed up and started wetting out the glass, I realized I did not have quite enough. I had to mix another batch, and so I did. I then had a lot left over, so moved onto the next layer of glass (or mat in this case). Again I ended up with not quite enough resin, so I kept going. The third batch of resin and layer of glass went on. As it turned out, I had to make another small batch to finish up the third layer, but looking back, I think I went about doing it in the quickest, most efficient way (read: all at once).
Sometimes you end up with imperfections in your glass work. It is a pain, because you have to go back and fix them. Unfortunately, I did not see this one until after it had cured. If I had spotted it before it cured, I might have been able to get the air bubble out of the glass layers.

This weekend I got some Alkyd primer on the underside of the hatch. Alkyd paint is an oil based paint. It is generally what they use on boat interiors because it repels water, oil, grease, etc. This was yet another tip I picked up from Don Casey in This Old Boat. I am going to try to get exterior grade Alkyd paint, rather than marine grade, because it is basically the same paint, but the can with a boat on it has a serious markup on it! I might have to spend the bucks on a marine grade primer for the fiberglass parts I am going to paint, like the hatch tops and bilge.
 The previous hatch never had a good seal, meaning that should there have been any kind of water taken over the bow, it most likely found its way into the forward cabin. I do not want this to happen. Unfortunately because I am using free wood to build it, the wood is in less than stellar condition. Some of the boards were cracking. I took some glue and forced it into the cracks and clamped the crap out of the boards. You might think that this is overkill, since none of the cracks when all the way through the boards. You will see the method to the madness in a second.
 Have you ever heard of a dado? I had not heard of one either until working on this project. It is a blade set used in a table saw to cut a groove in wood, much like a router would. By using the table saw and a dado, we were able to achieve very straight cuts, which is important to getting a good seal on the inner lip of the hatch.
 This is the result of using the dado. We had to use 2 passes to get the right width. With the mitered corners, the grooves matched up quite well. The boards were not exactly the same widths, so there is a little variation, but nothing major.

LAST WEEKEND!!
Last weekend I built yet another hatch (foredeck hatch). I also made some serious progress on the main hatch. The main hatch you've seen me standing on. While it is strong enough without glass, I decided that I needed to glass it for the waterproofing nature of fiberglass, as well as adding strength without too much weight.
The first thing to get accomplished before the glassing began was to remove the cross piece from the hatch that had been glued into place. My dad has been so eager to help, he took care of this for me during the week. It was not exactly a clean separation, but what do you expect with high quality wood glue? The reason the crosspiece needed to be separated before glassing is this: I do not have the hands of a professional fiberglass tech, so I would have ended up glassing it into place, on top of it already being glued into place. The next order of business was to round all of the corners on the hatch. I might have mentioned this before, but glass does not like to conform to sharp angles. By taking a belt sander to all of the edges, I was able to achieve a nice gentle curve for the glass to follow. The other bonus of doing this is that when the glass hardens, it will have a nice curved edge, which will look really nice. Finally I was ready to glass. I was going to do one layer, let it cure, and then move on to the consecutive layers. I don't know why I thought that was going to be a good idea, since it just meant a lot more work. It ended up not happening because I did not have a big enough container to mix resin in. If you mix too big a batch of resin, sometimes it will start to set WAY TOO SOON! When I got the first batch mixed up and started wetting out the glass, I realized I did not have quite enough. I had to mix another batch, and so I did. I then had a lot left over, so moved onto the next layer of glass (or mat in this case). Again I ended up with not quite enough resin, so I kept going. The third batch of resin and layer of glass went on. As it turned out, I had to make another small batch to finish up the third layer, but looking back, I think I went about doing it in the quickest, most efficient way (read: all at once).
Sometimes you end up with imperfections in your glass work. It is a pain, because you have to go back and fix them. Unfortunately, I did not see this one until after it had cured. If I had spotted it before it cured, I might have been able to get the air bubble out of the glass layers.
This weekend I got some Alkyd primer on the underside of the hatch. Alkyd paint is an oil based paint. It is generally what they use on boat interiors because it repels water, oil, grease, etc. This was yet another tip I picked up from Don Casey in This Old Boat. I am going to try to get exterior grade Alkyd paint, rather than marine grade, because it is basically the same paint, but the can with a boat on it has a serious markup on it! I might have to spend the bucks on a marine grade primer for the fiberglass parts I am going to paint, like the hatch tops and bilge.
YET ANOTHER HATCH
Just building hatches for the boat has been a huge project. Luckily the foredeck hatch is simple. It was not to be curved, and it was going to be made even more robustly than the main hatch. The reason for the simplicity and beefy construction is because this hatch, being on the foredeck, has the potential to take green water. For you landlubbers, when I boat takes on green water, it means that a wave has broken onto the boat's deck. Think about the force of waves at the beach. They are remorseless when it come to anything. I would like to think the hatch I have built will stand up to green water, but who knows. Hopefully I will never have to find out.
The final component to making the hatch was to attach the plywood top to the hatch. Instead of using 2 layers of 5mm plywood, like the main hatch used, I went with a piece of 1/2 inch marine grade plywood left over from the bulkhead project. Remember that project? Yes, I will be getting back to that once the hatches are done, and no, it is not done yet. The forward hatch will be glassed, but like the main hatch, I wanted to check that it had not been screwed up somehow before putting the time and money into glassing it.
Today's plan is to run around to a few marinas and chat with them about moorings for the summer. It is crunch time for getting something secured for the summer. With the weather warming up (well, kinda.... we got snow this week....), others are thinking about their boats and mooring/docking arrangements, so it makes it crunch time for me. I also hope to get out on the motorcycle today, even though its going to be a bit chilly (only about 50 degrees F).
Friday, April 12, 2013
Musings from another time and place!
I have noticed some traffic on an old blog I had that was part of an independent study course that I set up for myself when I was studying abroad in Russia. The course ended up being somewhat of a failure, as my Russian was not so great, and I did not get to really appreciate a lot of the museums I went to because I could not read about what I was seeing. On the other hand, there is quite a lot about my cultural impressions from my time there and chats with friends and teachers about Russia vs. America in terms of politics, culture, religion, etc. If you are interested in reading some about my experiences in Russia, feel free to check out the blog. I do have to note, I was much more idealistic about the world and politics in particular than I am now. That idealism really shows though.
 Another time and place blog.
 |
| Peter the Great in St. Petersburg |
 |
| St. Basil's Cathedral in Moscow |
 |
| Russian Maritime Museum in St. Petersburg (Yes, I was boat obsessed then too!) |
 |
| Fountain at the Summer Palace outside St. Petersburg |
Tuesday, April 2, 2013
Bye Bye Boat House!
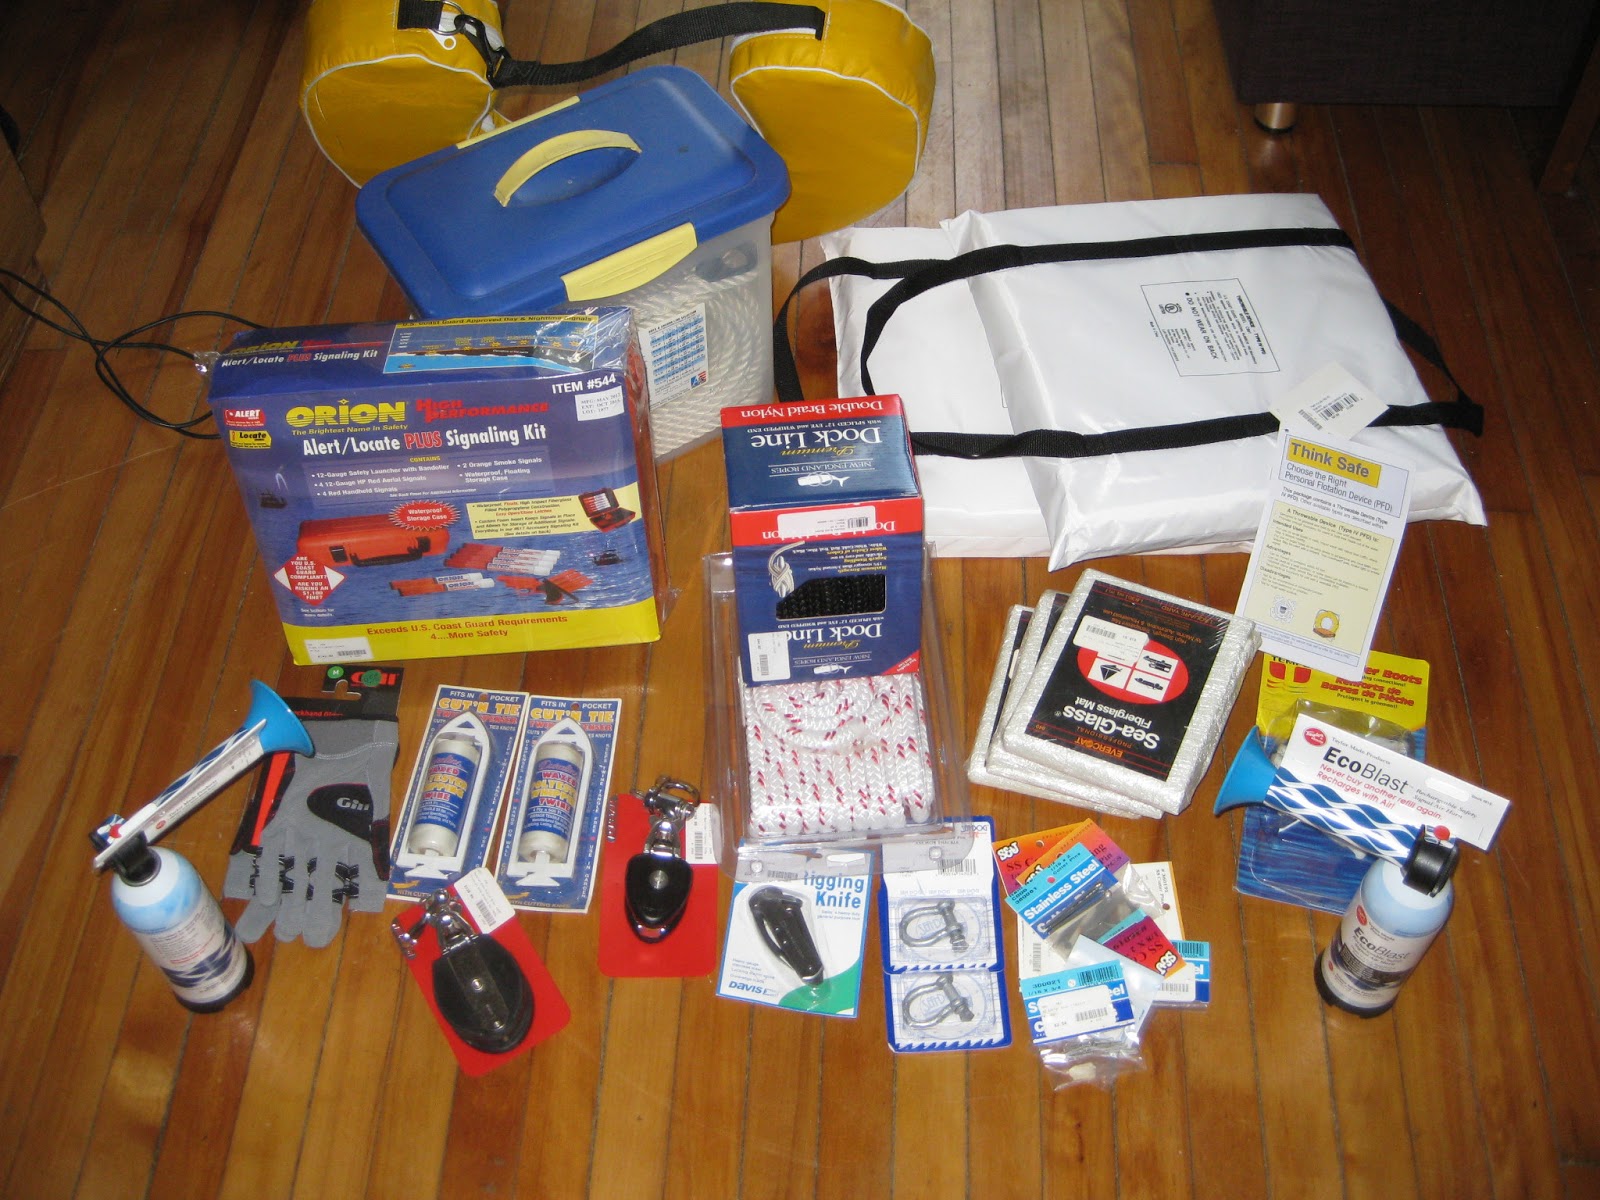 I'm sad to see The Boat House close, as they were so good to us at summer camp in terms of getting us parts, deals on boats, and in general just being great people. I've bought things from them in the past, but never like this. They are having a blowout sale, and with just about everything 70% off, its going to make hitting my budget targets a little easier. Unfortunately, with everything 70% off, it also makes me want to buy things that I WANT rather than NEED. To be honest, some of the things that I got I could have done without, but most of the things that I did get are mostly based on safety and meeting US Coast Guard regulations. For example, I got flares that won't expire til 2015, throw-able Type IV flotation aids, and air horns. A lot of the other things are parts and repair related. For example, shackles, cotter pins, ring-dings, fiberglass mat, and waxed whipping twine.
 BUILDING
 Okay, so now that I have justified buying a boat load of stuff, here is what I have accomplished on the hatch project. Here is one of the lazarette hatches in place on the boat. It is a little tough to see in the photo, but it over hangs the cockpit bench by over an inch, because I forgot to account for the hinge and spacer that came off of the previous hatch. It is okay, though, because its only fiberglass and can be cut and re-glassed and be as good as new. It is more work than I wanted to do, but that is what I get for not totally thinking out the entire project before jumping in and getting something done.

 Two weeks ago, my dad and I built the main hatch for the companionway. It had not occurred to me just how difficult it was going to be to build the hatch from measurements taken without really having a plan on how to construct the hatch in the first place. What compounded the issue is that my dad's shop is about 50 miles from where the boat is. I think it is also important to look at what we started with when working on a big project. To the right is the hatch that came off the boat. As you can see, is was beyond useable. It literally fell apart when I tried to open it last October when trying to decide if I was going to get the boat. Some days I think that I should have taken things like with a heavier grain of salt. On the other hand, I have been dreaming of owning my own boat for years, so jumping in over my head was probably the only way it was actually going to happen.
  We started with building a frame out of spruce that I got for free from the abandoned building a few months ago. Spruce is really strong because of it's long grain structure, so was used a lot for building airplanes before they all went to aluminum frames and skins. It is also quite light in weight for its size. All told, the hatch (before fiber glassing) only weighs about 15-20 pounds. That included the two layers of plywood that cover the frame top and the hardware.
 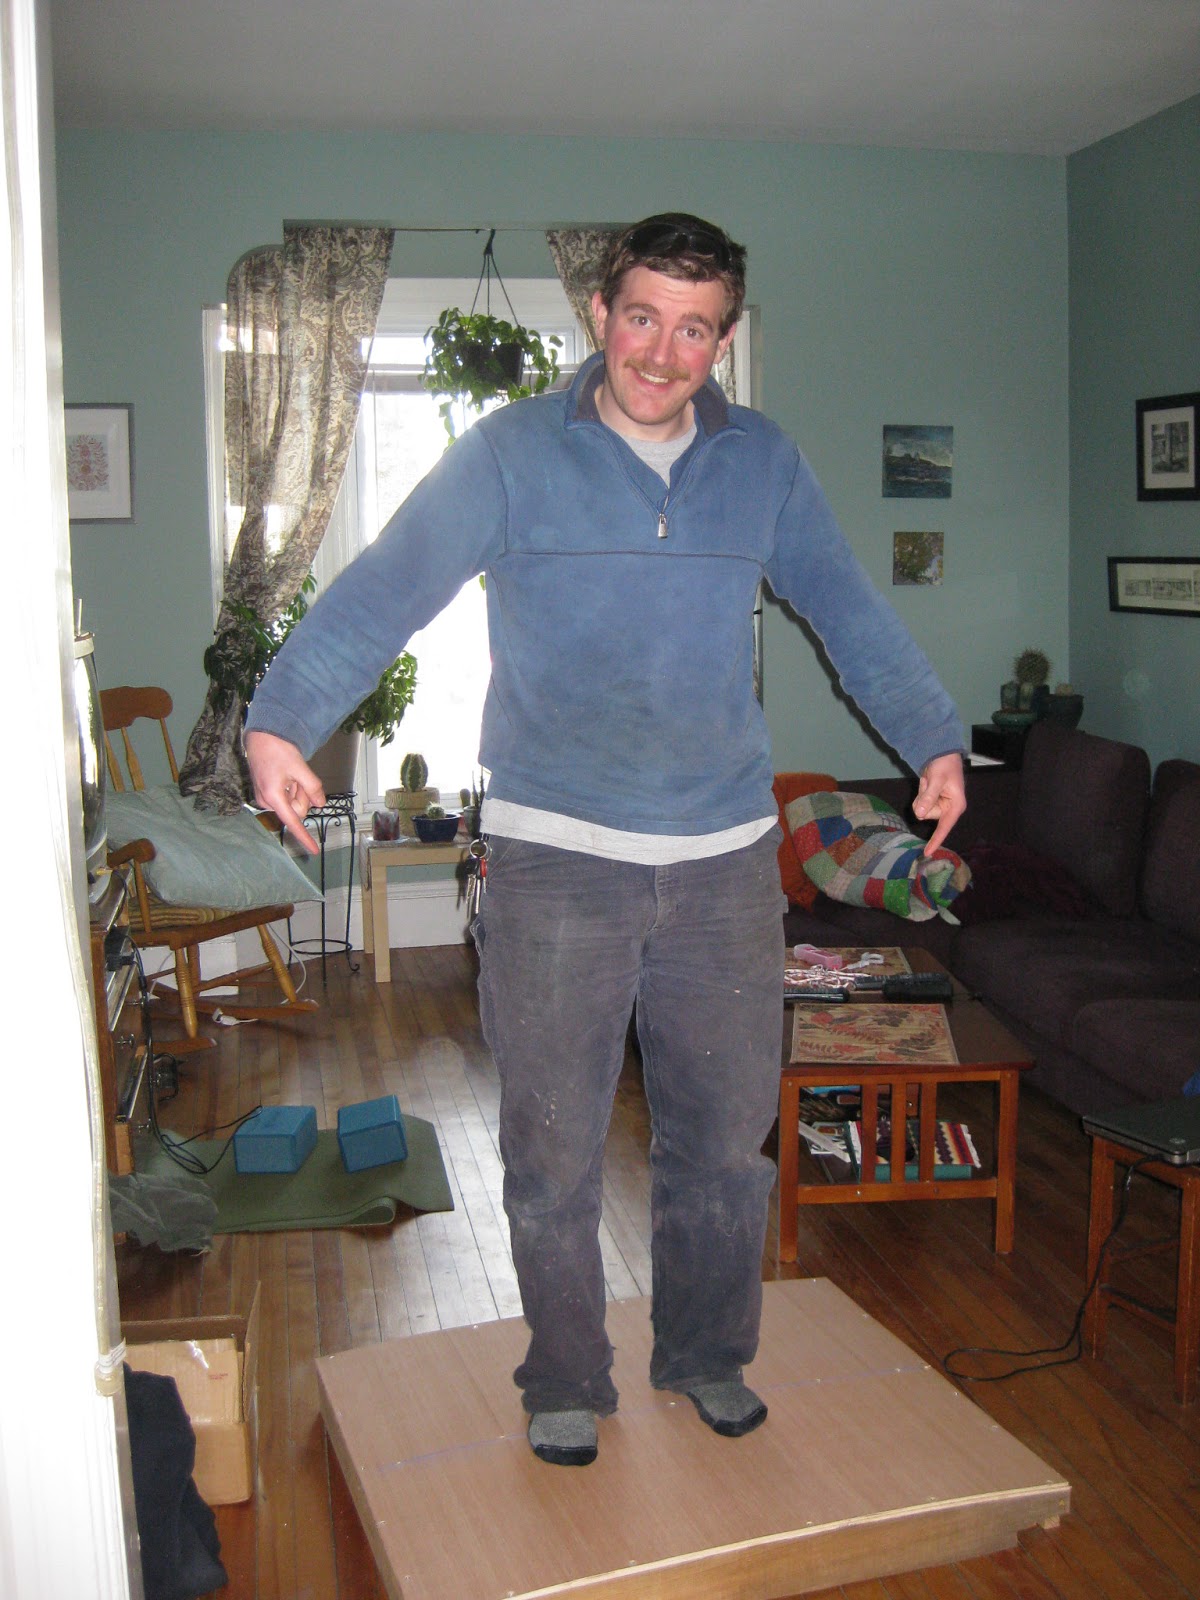 The previous hatch was flat, so it therefore did not shed water. I did not want to go through the entire process of building a hatch to have it rot because of standing water. We cut a curve into the cross pieces to give a one inch rise to the center of the hatch. This should be more than enough to shed water, but to be on the safe side, the hatch will also be covered in fiberglass to make sure that the water does not penetrate though and rot the wood.
 When I was on the boat a few weeks ago, I was crawling all over the place trying to get a second tarp in place, as the first is very Pope-like, and no longer sheds water thoroughly. At some point I crawled over the cabin top where the main hatch slide, and the whole cabin top flexed significantly under my weight. I knew then why one of the rails had broken away from the cabin top, and also realized that I needed to make a hatch that could actually stand up to being stood on. If the hatch can take 200ish pounds standing on it before being glassed, I would have to say that I did a good job making a strong hatch. And yes, I am actually standing on the hatch, I was NOT photoshopped in.
FITTING
 The next step in the process was to see if the hatch that was built actually fit. The initial verdict was no. I am usually not one to be dissuaded from something that I have already works so hard on, so out came the power tools, the sharpies, and the brain power, and the trimming began. It was not the prettiest fitting job that anyone has done, but it at least got the job done so that the hatch can slide most of the way into place, but I will get to that in a minute. For the first try, the hatch would not even slide onto the rails. I had not realized the optical illusion the that curved cabin top had played on me. The outside edges of the rail are angled, not perfectly vertical. The sides of the frame ARE perfectly vertical, and so the bottom edges had to be cut away. I bent a blade to my reciprocating saw, but that is okay. I had no other means to trim the hatch, so a bent blade is an acceptable cost of getting the job done. When I get up to the shop this weekend, I will be able to sand the cuts smooth, instead of the rough hack job they are currently.

Once I could slide the hatch onto the rails, I found out the the measurements I had taken for the forward most cross piece had been off. You can see the sharpie marks from me trying to trace myself a line to follow with the saw. I did not want to take off too much material, because once you cut it, its gone, which is why I had several lines. I could take off a bit, fit it again, and see how much more I had to take off.
Jenny took this picture of the triumph of getting the hatch on the boat. Here is the sticky part: I also did not account for the lip of the companionway being curved with the rest of the cabin top. This is actually a good thing. It means that I can take the aft most crosspiece out, and because it does not clear the companionway lip, it will not slide off forward. What sucks is that I glued the crosspiece into place. I have to figure out how to un-glue waterproof wood glue. It might be time to break out the chisel. To be honest though, I am really excited to have hatches that are going together quite well, even without being able to test them immediately on the boat. With all projects there are hiccups, and lets be honest, how else am I going to learn????
Monday, March 18, 2013
I've been hatching this idea...... and MAINE Boatbuilder's Show
I think my life has settled down a bit to where I might actually be able to get work started again on the boat, but only time will tell. In the mean time, here are some updates as to what precious little I have accomplished in the last few weeks.
I've been hatching this idea.....


 I have been able to start on my cockpit lazarette hatches. I did some work on them a few weeks ago, and never got around to posting what I accomplished. I decided to go the composite route because I do not know enough about woodworking yet to make a nice, square, professional looking wood hatch. Plus, I just need a quick and dirty hatch to get me water proof-ish so I can move aboard. The fancy stuff can come later. As a point of reference, the two pictures (left and right) are of one of the original wood hatches that came in all of their dis-repaired and abandoned glory. As you can see from the left picture, they were very nice back in the day, and by being on the underside of the hatch, it still is in good shape. The picture on the right is of the top of the hatch, and is a board screwed to the top of the hatch. It was not varnished or otherwise coated to protect it from the elements, and therefore warped.
 To start, my dad helped me to cut some 1/8" plywood cores for the hatches. I could have done them myself, but father-son bonding is always good, and I know better than to get between a man and his power tools! Originally I thought about making pure glass hatches, or maybe having a foam core, but was unable to find foam coring that was thin enough for what I needed, especially in a small enough quantity to make it worth the money. I did find a sheet of 1/8" plywood for cheap, and decided to go that route instead. Because I only have 3/4" thickness to make, I had to make the hatches strong, even though they are thin. They will be regularly stood on, sat on, and generally abused. Plywood is a pretty good place to start for that. I took two cores, and used polyester resin to glue them together. This will give more rigidity to the hatches.
 Because the plywood was so thin, I had to clamp, weight, and pray that they would glue together flat and square. It would have been easy enough to trim them, had they not come out as I had hoped they would. For this project I decided to switch to polyester resin almost purely for cost. The hatches are not going to be permanent forever, so I can compromise a bit on the quality. Plus, when you can get a gallon of polyester resin for $35, and the same amount of epoxy resin and hardener will run you about $150, it just doesn't make sense to spend more on an experiment.
 When I got around to actually laying glass on the plywood cores, I used two different methods with greatly different results. The first method was to wet the glass out and lay it on top of the core and drape it over the edges of the core. When that set, I turned it over and glassed the back side, and butted it against the now upturned edges to make a full sandwich (see picture right). Then out came the angle grinder and trimming ensued with a mass of dust, noise, and only a little itching.
 When I finished the first hatch, I decided that it had not come out as well as I had wanted, so thought that I would try a new method. I decided that I would make a mold for the hatch to try to get a better wrap-around on the core. I made a wood frame, then laid a trashbag into the mold, as the polyester resin does not stick to the plastic. I then started laying up layers of glass as I wet them out. Once I had the appropriate number of layers of alternating glass and roving, I pressed the core into the mold and wrapped it glass around the edges. While, yes, it wrapped better, the problems that it created were greater than the good edge wrap. If you took a map of the Grand Canyon, or Sierra Nevada's, or the Alps and made a topographically accurate 3D view of it, this is what the top of the hatch looked like. After 20 minutes of grinding, and half a pint of Bondo later, it is flat on top.
Now here is the kicker: I spent 2 days working on the hatches. I took one of them to the boat after mounting the hinge and backing block to see how it fit. Unfortunately, I did not account for the hinge and backing block, so the hatch hangs over by almost 3/4". So, I have more glassing to do, once I remove the extra material from the hatch.
MAINE BOATBUILDER'S SHOW
 Jenny and I went to the Portland held Maine Boatbuilder's Show this weekend. I wanted to go talk to vendors, look at all the pretty boats, and try to get ideas for what I can do on my project. It was also a great way for Jenny to see all that CAN be involved in boating. It was also a great way to think about my project in regards to why I am working my ass off at 3 jobs and rebuilding a boat instead of buying a new one. While I am not really interested so much in power boats, the price tag on the R27 Tug shows pretty clearly what new boats run. This tug style cabin cruiser is only a foot longer than my Columbia 26, but even the boat show sale price tag would buy you a really decent house on a few acres in the country. This is why I bought an $800 boat that needs several thousand dollars of work and refit, because in the long run, its still a hell of a lot cheaper than buying new and I will have marketable skills when I am done.
In wondering about and talking to vendors, I found that there were a number of vendors that were live-aboards currently or formerly. When I told them what I am doing, I got peppered with questions like "How are you going to have hot water? What are you using for a head? Where are you keeping your boat? What are you doing for propulsion, or are you going motor-free? You're going to live on a 26 footer year round? Good luck!" It was both somewhat overwhelming, but also very enlightening and heartening to see that others have done this, and were willing to help me puzzle though my project and give me recommendations on resources to help me along. Being sales people, they also had many suggestions as to what I needed to buy to help my project along, but I feel that they were genuinely trying to help me, more than trying to sell me their products. I hope I don't get them in trouble with their bosses for saying so, but when I get around to refitting, their willingness to help me puzzle through the live aboard fitting out will earn them a customer when I either move on to the next boat, or have the money to fix this one up more. Sometimes a no pressure sales approach is better long term.

 I hate to say it, but I decided that I needed ideas that might work for me, so the boat show was a way to do some reconnaissance. There has been some discussion in the offshore cruising books I have read about skipping the liferaft and using your dingy as it's replacement. The benefit of this is that you can make a rig to have a sail, lee boards, and rudder to try to make progress towards land or rescue, rather than sitting in a raft hoping someone knows to come look for you. I saw two such ideas, one for a digny, and one on an Adorondac guide boat. I think either can be adapted for my dingy when I get to that point in the project.
My parting thought to you for today: If you thought my project was massive and overly optimistic, check out this wooden boat project that was on display at the boat show.


I've been hatching this idea.....


 I have been able to start on my cockpit lazarette hatches. I did some work on them a few weeks ago, and never got around to posting what I accomplished. I decided to go the composite route because I do not know enough about woodworking yet to make a nice, square, professional looking wood hatch. Plus, I just need a quick and dirty hatch to get me water proof-ish so I can move aboard. The fancy stuff can come later. As a point of reference, the two pictures (left and right) are of one of the original wood hatches that came in all of their dis-repaired and abandoned glory. As you can see from the left picture, they were very nice back in the day, and by being on the underside of the hatch, it still is in good shape. The picture on the right is of the top of the hatch, and is a board screwed to the top of the hatch. It was not varnished or otherwise coated to protect it from the elements, and therefore warped.


Now here is the kicker: I spent 2 days working on the hatches. I took one of them to the boat after mounting the hinge and backing block to see how it fit. Unfortunately, I did not account for the hinge and backing block, so the hatch hangs over by almost 3/4". So, I have more glassing to do, once I remove the extra material from the hatch.
MAINE BOATBUILDER'S SHOW

In wondering about and talking to vendors, I found that there were a number of vendors that were live-aboards currently or formerly. When I told them what I am doing, I got peppered with questions like "How are you going to have hot water? What are you using for a head? Where are you keeping your boat? What are you doing for propulsion, or are you going motor-free? You're going to live on a 26 footer year round? Good luck!" It was both somewhat overwhelming, but also very enlightening and heartening to see that others have done this, and were willing to help me puzzle though my project and give me recommendations on resources to help me along. Being sales people, they also had many suggestions as to what I needed to buy to help my project along, but I feel that they were genuinely trying to help me, more than trying to sell me their products. I hope I don't get them in trouble with their bosses for saying so, but when I get around to refitting, their willingness to help me puzzle through the live aboard fitting out will earn them a customer when I either move on to the next boat, or have the money to fix this one up more. Sometimes a no pressure sales approach is better long term.

 I hate to say it, but I decided that I needed ideas that might work for me, so the boat show was a way to do some reconnaissance. There has been some discussion in the offshore cruising books I have read about skipping the liferaft and using your dingy as it's replacement. The benefit of this is that you can make a rig to have a sail, lee boards, and rudder to try to make progress towards land or rescue, rather than sitting in a raft hoping someone knows to come look for you. I saw two such ideas, one for a digny, and one on an Adorondac guide boat. I think either can be adapted for my dingy when I get to that point in the project.
 My parting thought to you for today: If you thought my project was massive and overly optimistic, check out this wooden boat project that was on display at the boat show.


Friday, March 15, 2013
Money money money MONEY!!!
You know when you jump into a major project thinking it won't cost all that much, or that you will have no trouble meeting your deadlines and finish dates? Yea, I remember that from six months ago. Too bad I was wrong in all of my assumptions. That's how these things go. I know, I have done a number of large scale projects (the $800 Liveaboard being by far the biggest and most complicated). So, since I have been roughly calculating what I need in terms of money to get the equipment/supplies/components to finish the boat enough to get her in the water, as well as trying to find a mooring/slip that is in the budget, I have determined that I grossly underestimated the costs involved. To help alleviate the problem of money, I am thinking about taking on a 3rd job (or second boat fund job) coaching sailing. Part of it is because I love sailing, coaching, and SailMaine, but it is also because I need to finish the boat project to where I can safely live aboard so that the boat (and myself) do not wear out our welcome in our winter homes. This means on top of the 50 hours a week I already work, I will be adding roughly another 10-12 hours of coaching to my schedule. I must be crazy, or love sailing a whole hell of a lot.....
PS- In case you were doubting that I am working my ass off to afford this project, I submit the above as proof of point. I don't have a trust fund, parents that are paying my bills, or any other assumption that I am rich. Could I do this project more cheaply? Absolutely, but I do not want to sacrifice safety or quality to get it done, nor do I want to get rid of things like my truck that I use daily to commute to my several jobs.
PS- In case you were doubting that I am working my ass off to afford this project, I submit the above as proof of point. I don't have a trust fund, parents that are paying my bills, or any other assumption that I am rich. Could I do this project more cheaply? Absolutely, but I do not want to sacrifice safety or quality to get it done, nor do I want to get rid of things like my truck that I use daily to commute to my several jobs.
Sunday, February 17, 2013
Leaning tower of Boatza?
I know, its been several weeks since I did a blog post. That is because it has been several weeks since I was able to work on the boat. I spent 2 weekends recovering from a seriously pulled muscle in my back, followed by a week long business trip to Boston. You were all secretly hoping that I would come back and say "Surprise, the boat is done!!!", weren't you?


So, what have I gotten accomplished today? I lifted my boat so I could re-block the keel. Since we have been having warm weather, the keel blocking has sunk into the ground, but unfortunately, it has done so unevenly. As you can see from the photos, it is still somewhat uneven, but at least it is better. I wish I had taken a before picture. In any case, I would not recommend someone else doing this. I used the front 3 jack stands to slowly raise the boat off the front blocking. There are two reasons that I do not recommend doing this with your boat. The first is that you have the possibility to damage the fiberglass, especially when it is cold. The second is that you have your boat up in the air, so there is a possibility to have your boat fall over, or worse, on you. That being said, I did not have either of these issues. I was none the less concerned about these issues while doing it. I did make sure the stands on the sides of the hull were placed so they were pushing against the bulkheads inside the hull, so that lessened my risk of hull damage, and helped to distribute the weight of the lift around the boat. I was able to get some 3/4 inch plywood under the 8x8 beam, but this is a temporary fix. When I get more time, I am going to have to lift the boat again and put a real board under the 8x8, as the plywood is likely to rot once things start to melt.
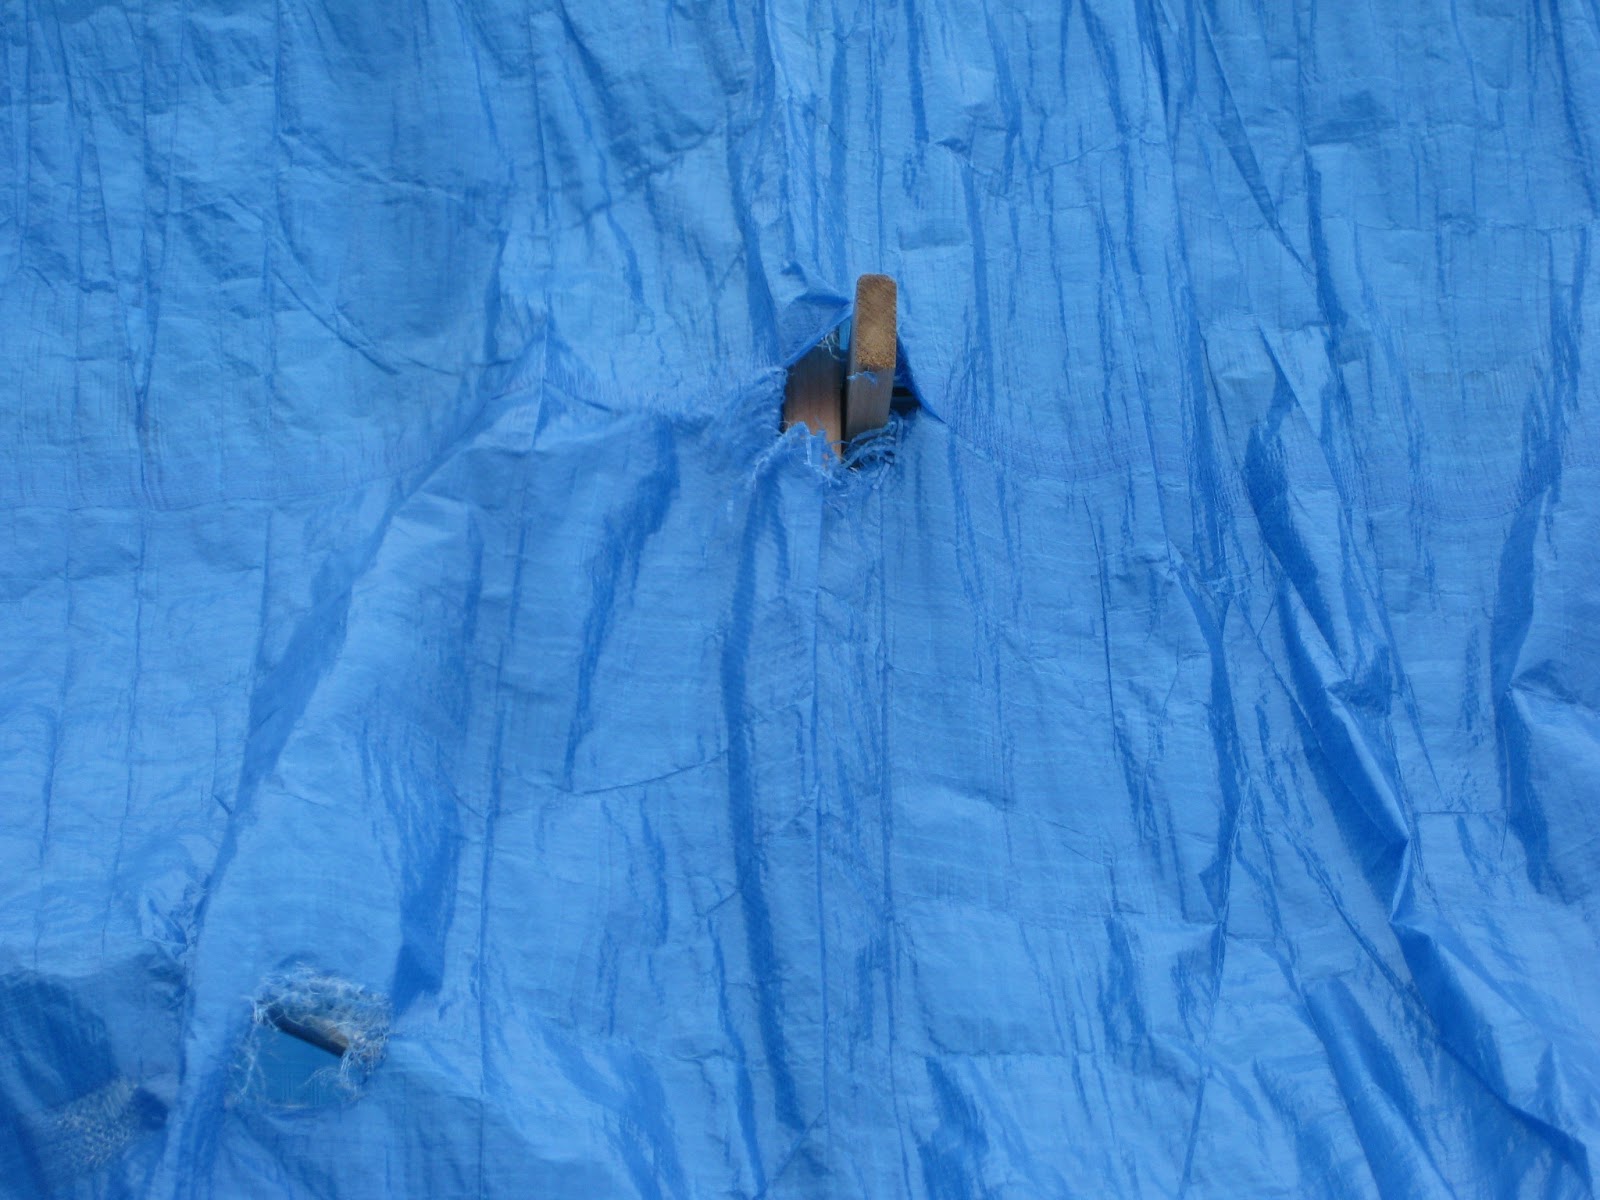 Speaking of which, sometimes you get what you pay for. I thought that I had gotten a really stellar deal on my tarp for covering my boat. Unfortunately, it has been holed in several places on things like stanchions, 2x4 framing, and the pulpit. It is a good thing that I screwed up in buying my first tarp, because I can now place it under the first tarp to help keep the rain out that spring will inevitably bring.

So, what have I gotten accomplished today? I lifted my boat so I could re-block the keel. Since we have been having warm weather, the keel blocking has sunk into the ground, but unfortunately, it has done so unevenly. As you can see from the photos, it is still somewhat uneven, but at least it is better. I wish I had taken a before picture. In any case, I would not recommend someone else doing this. I used the front 3 jack stands to slowly raise the boat off the front blocking. There are two reasons that I do not recommend doing this with your boat. The first is that you have the possibility to damage the fiberglass, especially when it is cold. The second is that you have your boat up in the air, so there is a possibility to have your boat fall over, or worse, on you. That being said, I did not have either of these issues. I was none the less concerned about these issues while doing it. I did make sure the stands on the sides of the hull were placed so they were pushing against the bulkheads inside the hull, so that lessened my risk of hull damage, and helped to distribute the weight of the lift around the boat. I was able to get some 3/4 inch plywood under the 8x8 beam, but this is a temporary fix. When I get more time, I am going to have to lift the boat again and put a real board under the 8x8, as the plywood is likely to rot once things start to melt.
Speaking of which, sometimes you get what you pay for. I thought that I had gotten a really stellar deal on my tarp for covering my boat. Unfortunately, it has been holed in several places on things like stanchions, 2x4 framing, and the pulpit. It is a good thing that I screwed up in buying my first tarp, because I can now place it under the first tarp to help keep the rain out that spring will inevitably bring.  |
| She looks pretty good in a winter wonderland, but will look better on the open ocean! |
Subscribe to:
Posts (Atom)